
Table of Contents
Introduction
Creating custom email accounts with your domain name adds a professional touch to your business communications. If you’re using the Plesk Control Panel, setting up these email accounts is straightforward and can be done in a few simple steps. This guide will walk you through how to create an email account in Plesk, ensuring you can manage your domain’s email addresses with ease.
Here are the steps to create an email account in the Plesk Control Panel:
Creating an email account in Plesk is a quick and efficient way to set up professional email addresses associated with your domain, Let’s see about the steps for creating the Email accounts in Plesk control panel.

Log in to Plesk
- Access your Plesk Control Panel by navigating to
yourwebsite.com:8880or the specific URL provided by your hosting provider. - Log in with your Plesk control panel credentials.
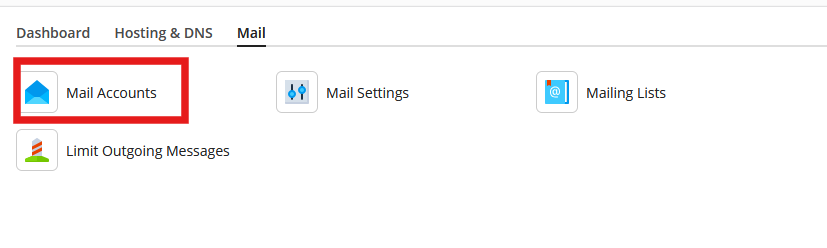
Navigate to the Mail Section
- From the main dashboard, go to Mail in the left sidebar.
- In the Mail section, select the domain for which you want to create an email account.
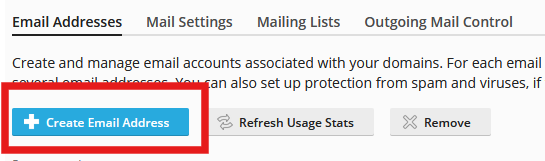
Add a New Email Address
- Click on Create Email Address (or Add New Mail Account depending on your Plesk version).
Configure Additional Settings (Optional)
- You may configure additional settings, such as Autoresponders or Forwarding options, by clicking on Advanced Settings or similar options available on your screen.
Save the Account
- Click OK or Save to create the email account.
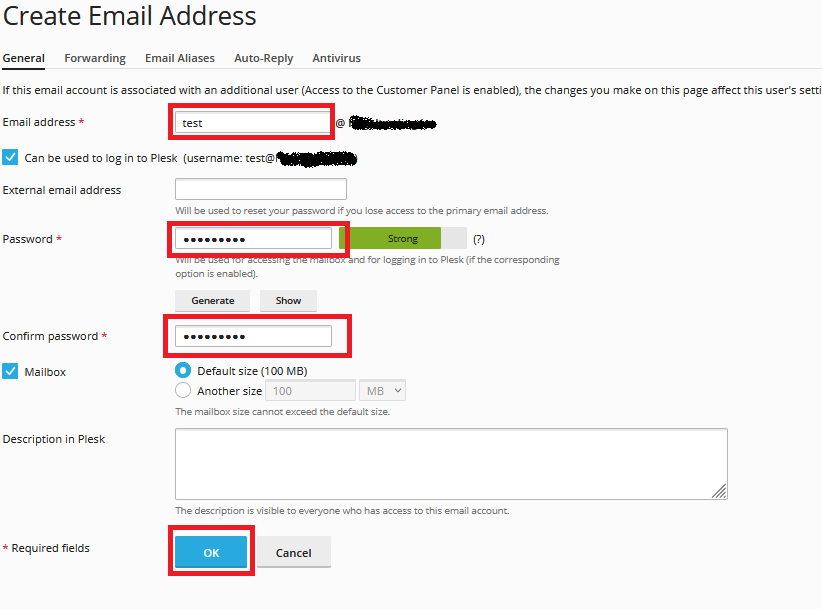
Enter Email Account Details
- Email Address: Type the desired email name (e.g.,
test@yourwebsite.com). - Password: Enter a secure password for this email account, or use the Generate button to create a strong password.
- Mail Settings: You can set options for the mailbox size or leave it at the default value.
Verify and Access the New Email Account
- Your email account should now appear in the Mail section.
- You can access it through Webmail by navigating to
webmail.yourwebsite.com(replace “yourwebsite.com” with your domain) or configure it in an email client using the account details.
By following these steps, you can successfully set up a new email account in Plesk, allowing you to send and receive emails using your domain.
This setup not only offers professional branding for business communications but also enhances security and organization for your domain’s email management. Plesk’s streamlined process makes it simple for businesses to establish reliable, branded email accounts effortlessly.
When your domain is hosted on a server with Plesk, email accounts creation and management are simplified through its intuitive interface. Once the email account is created, you can access it using Webmail (by going to webmail.yourdomain.com) or set it up in email clients like Outlook or Thunderbird. This Plesk setup not only provides security and control over your business’s email but also ensures seamless integration with your hosting plan, helping maintain a cohesive digital presence.
Conclusion
With these steps, you can quickly create and manage email accounts in your Plesk Control Panel, allowing for professional and branded communication. Having a personalized email account not only builds trust with your audience but also keeps your business organized. Remember to regularly check your settings and explore additional options like autoresponders and forwarding to optimize your email experience.